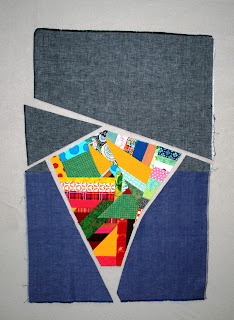
Place the patch on a background RIGHT SIDES UP
My basket patch was big enough which required to piece the background.
Start cutting from the upper right corner moving counter clockwise to the left of the patch.
This is required if you have angled top to the basket top.
When piecing the background to the basket patch, start sewing the last cut piece first.
In other words, clockwise from the bottom right corner moving towards left.
Sew the bottom left corner of the background to the basket.
The left upper edge and then the right top corner piece.
Place the handle and base for eyeballing the size of each piece.
Trim the extra background fabric from the bottom edge of the basket. You will use this to sew the base of the basket.
Place the base of the basket on top of the background base fabric RIGHT SIDES UP matching the top edges and trim off the top tip of the triangle base.
Sew both sides of background to each side of the triangle base of the basket.
You should have a piece that looks like this. Trim off top and bottom to finish the edges.
I sewed another strip of background fabric at the base of the base!
With Right sides together, stitch the base to the bottom edge of the basket.
Cut a desired size handle from the freezer paper for template. Iron it on the right side of the fabric. Add 1/4" seam allowance and cut out the handle.
Machine or hand applique the handle on to the top of the basket.
Questions? Send me an email.


It looks great,I love basket quilts!
ReplyDeleteI loved looking at every single picture! Baskets have always been a favorite of mine, so I don't know why I never tried this kind of thing. I can't decide which is my favorite, but I know my next scrappy project will definitely be a basket block!
ReplyDeleteThis is going to be fun. I love baskets of all types - Hugs Nat
ReplyDelete